Git add
- Working principles
- Staging area
- Common options
- Examples of git add
- Interactive mode
- Editing patches
Description
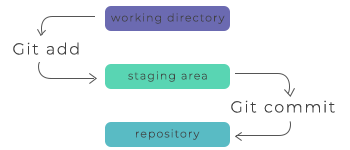
The git add is a command, which adds changes in the working directory to the staging area. With the help of this command, you tell Git that you want to add updates to a certain file in the next commit. But in order to record changes, you need to run git commit too. In combination with the commands mentioned above, git status command is also needed to see which state the working directory and the staging area are in.
Working principles
The git add, along with git commit are used to record project versions into the history of the repository. They are must-know for every Git user, as they compose the basis of Git workflow.
While developing a project, you first edit the files in the working directory, then when a copy of the current state is ready to save, you need to stage changes, which is done with the git add command. The git add command should be called every time altering a file.
Staging area
The basic role of the git add command is promoting changes in the working directory to the git staging area. The staging area of Git is one of its most special characteristics, which let's gather all the connected changes into highly focused snapshots. Only after that, you can commit these changes to your project history.
Common options
- Staging changes in <file> for the next commit:
git add <file> - Staging all changes in <directory> for the next commit.
git add -p
Examples of git add
The git add and git commit commands are used to create an initial commit of the current directory, as well as recording changes to existing files.
After starting the project you can add new files bypassing the path to git add.
git add hello.pygit commitInteractive mode
An interactive staging session lets you choose portions of a file to be added to the next commit. You will be suggested a chunk of changes and prompted for a command. The available options are the following ones:
- y - staging the hunk
- n - not staging the hunk
- q - quit; not staging the hunk or any remaining one
- a - staging the hunk with all later hunks in the file
- d - not staging the hunk or any later hunk in the file
- g - selecting a hunk to go to
- / - searching for a hunk which matches the given regex
- j - leaving the hunk undecided, checking the next undecided hunk
- J - leaving the hunk undecided, checking the next hunk
- k - leaving the hunk undecided, checking the previous undecided hunk
- K - leaving the hunk undecided, checking the previous hunk
- s - splitting the current hunk into smaller ones
- e - manually editing the current hunk
- ? - the print help
Editing patches
Calling git add -e or selecting e from the interactive hunk selector opens a patch in the editor; after exiting the editor, the output is applied to the index. Arbitrary changes are made to the patch, but some changes may have complicated outputs or even output in a patch that is inapplicable. If you want to decline the operation entirely, simply delete all lines of the patch. Here are some common things you may see in a patch, and which editing operations make sense on them.
Lines starting with "+" represent added content. You can delete them in order to prevent staging any addition lines.
Lines beginning with "-" represent removed content. In order to prevent staging their deletion, you can convert the "-" to a " " (space).
Modified content is shown with "-" lines (deleting the old content) followed by "+" lines (adding the replacement content). For preventing the staging of the modification, you can convert "-" lines to " ", and remove "+" lines. Note that modifying only half of the pair may cause confusing changes to the index.


